How to add and manage items in gantt
Add a tasklist
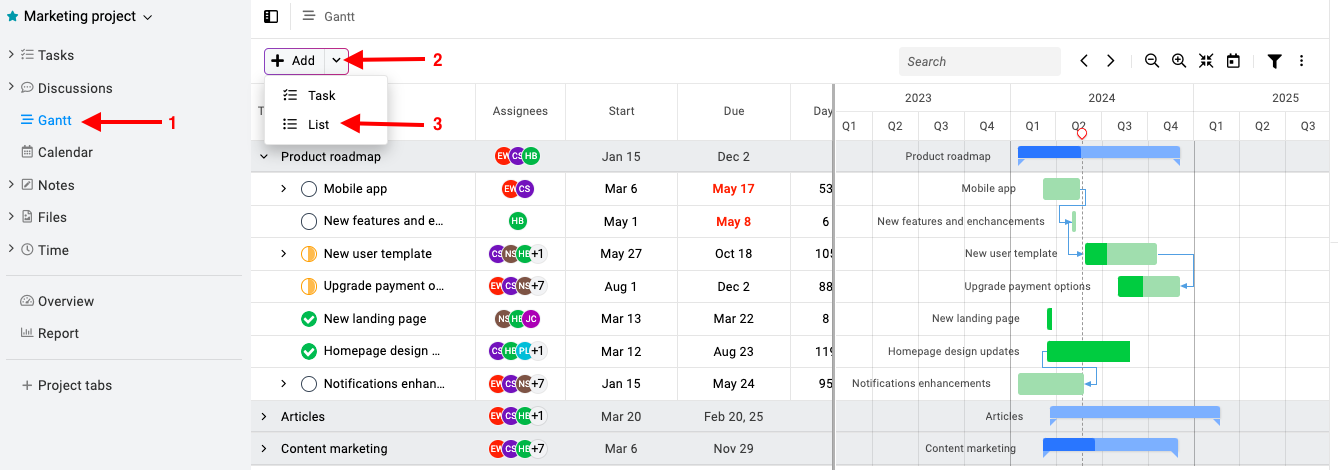
- Navigate to the gantt section: Go to the gantt section of the project where you would like to add the tasklist. Click on the “Add” button and select “List“.
- Enter the list details:
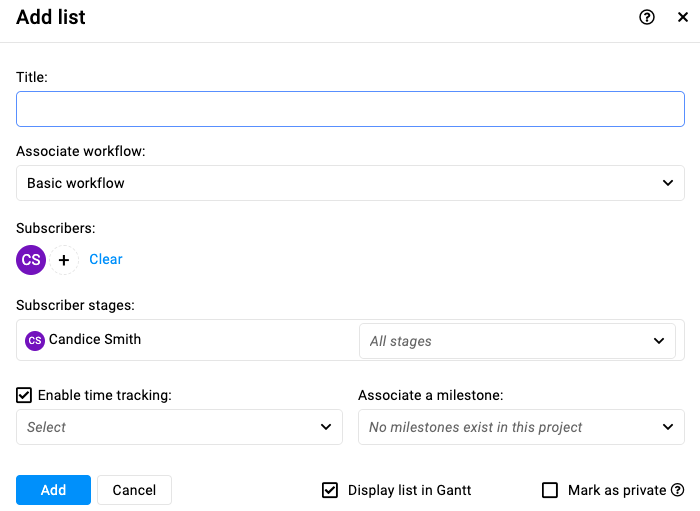
- Title: Enter a descriptive title for the task list.
- Associate workflow: Choose a workflow from the existing dropdown list to define task stages and progress. (For more on workflows, click here).
- Subscribers: Add team members who will be involved in this task list.
- Subscriber stages: Select the stage for which subscribers will receive notifications.
- Enable time tracking: Choose a timesheet for logging time spent on tasks within this list.
- Associate a milestone: This milestone could represent an important event or goal related to the task list.
- Mark as private: Check the “Mark as private” option if you need to restrict the visibility of the the tasks within the tasklist to the subscribers only.
- Save the tasklist: Click the “Add” button to save your tasklist.
Note: “Display list in Gantt” will be checked automatically when you create task list in gantt.
Add a task
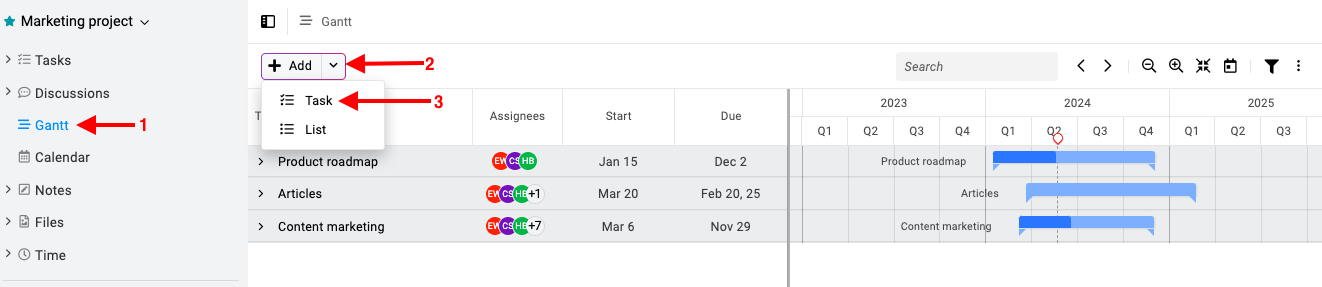
- Navigate to the gantt section: Go to the gantt section of the project where you would like to add the task. Click on the “Add” button at the top-left of the page and select “Task”.
- Enter the task details:
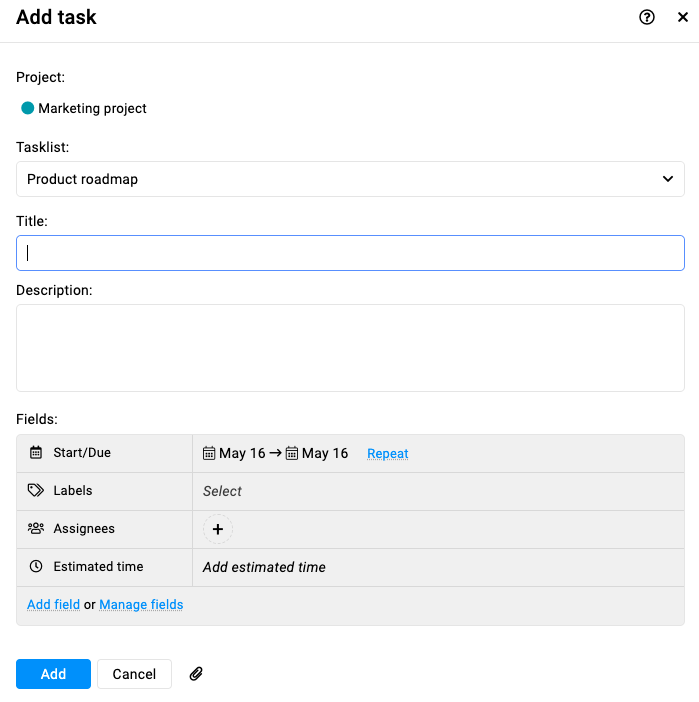
- Project: Choose the project where you would like to add a new task.
- Tasklist: Specify the task list within the selected project where the task will be added.
- Enter the title and the description.
- Select the start date and end date of the task.
- Labels: Assign relevant labels to categorize and identify the task.
- Assignees: People who should be part of the task or responsible for completing the task.
- Estimated time: Specify the estimated time required to complete the task.
- Custom fields: Add custom fields to capture specific information related to the task. Additionally, any custom fields added to the selected task list will also be visible. Refer to additional documentation for details on custom fields.
- Add files & documents: Attach any necessary files or documents related to the task.
- Save the task: After entering all required information, click on the “Add” button.
Add a subtask
- Right-click on an existing task and select “Add subtask“.

- Enter the subtask details:
- Project: Choose the project where you would like to add a new task.
- Tasklist: Specify the task list within the selected project where the task will be added.
- Enter the title and the description.
- Select the start date and end date of the task.
- Labels: Assign relevant labels to categorize and identify the task.
- Assignees: People who should be part of the task or responsible for completing the task.
- Estimated time: Specify the estimated time required to complete the task.
- Custom fields: If applicable, add custom fields to capture specific information related to the task. Additionally, any custom fields added to the selected task list will also be visible. Refer to additional documentation for details on custom fields.
- Add files & documents: Attach any necessary files or documents related to the task.
- Save the task: After entering all required information, click on the “Add” button.
Note: The task lists, tasks, and subtasks added from gantt will be synced in other sections as well.
Change view
To adjust gantt as per your system resolution, click on the zoom to fit icon at the top-left of the page.

Click on the zoom in or zoom out icon to adjust the timeline view.

Use the previous and next icons at the top-left of the screen to browse through the project timeline.

Filters
You can filter tasks in gantt on the basis of the assigned team members and dates.
Assigned: You have the capability to search for the person to whom a task is assigned. Additionally, you can choose between “All” or “Unassigned” options to filter and view tasks accordingly.
View tasks: This filter provides flexibility in customizing task views based on specific timeframes and scheduling criteria, facilitating efficient project management within the gantt interface.
Further, it has the following options:
- Due anytime: Displays tasks regardless of their due dates. This filter is useful for viewing all tasks irrespective of their deadlines.
- With no date set: Filters tasks that do not have any assigned start or end dates. This option helps identify tasks that require scheduling.
- Within the range: Shows tasks that fall within a specified date range. You can define a start and end date to view tasks scheduled within that timeframe.

Critical path
Highlighting the critical path allows you to see the tasks that are currently affecting your project’s end date. To enable the critical path view, go to the three dots at the top-right of the page and select the option “Highlight critical path“. 
Constraint
The constraint option enables you to set limitations or dependencies on tasks within a project timeline. These constraints determine when a task can start or finish.
Setting Constraints: You can set constraints on tasks directly within the gantt by clicking on a task and selecting the “Constraint” option. You can then choose the type of constraint and specify the date or time according to their requirements.
Note:
- When you add a start date from gantt it will add the constraint by default to “Start no earlier than” and when the constraint is removed from the task it sets the date to the earliest set start date in the task list.
- The constraints are solely for graphical representation, so you can still mark a task as complete.
Need more help?
- Can't find the answer to your questions? Contact ProofHub Support
- You can also book a demo.