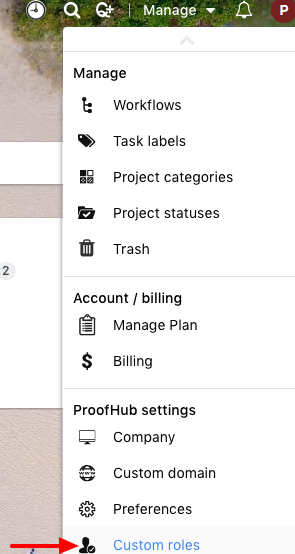
ProofHub enables you to customize the roles that you may want to assign to users added to your account. You can provide them with different access levels for each section of ProofHub.
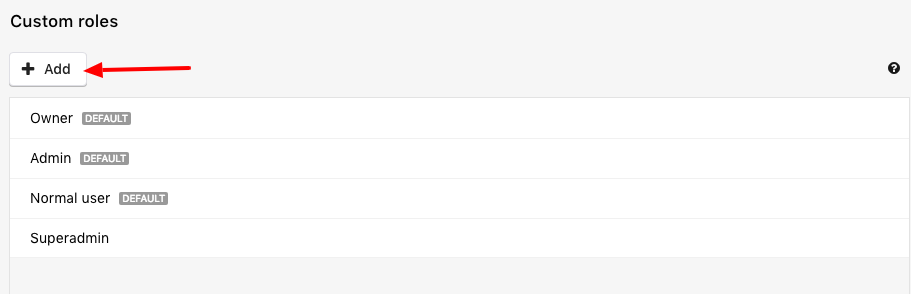
There are three predefined roles in ProofHub:
Owner and admin can see all the projects added to the account whereas a Normal user can only see the assigned projects in their account. Since these roles are predefined so they can not be edited. However, you can always create a new role and define the access level or permission for each section. here’s how:
Add new role

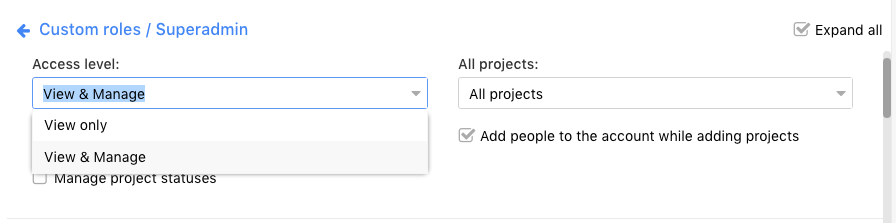
There are three types of access levels to customize a role in ProofHub.
View only – With this option, one can only view things in their account but won’t be able to add, edit and manage them.
View and add – With this option, one can view things in a section and also, add items in it but can’t edit any item.
Note:
View and manage – With this option, one can give users access to view, add, edit, delete and manage items from their account.
Now, select the checkbox Expand all, it will let you define the access level for each section of ProofHub:
Projects:
Following are the access levels:
View only: A person who has been assigned this access level can only view the projects. He or she will NOT be able to add new projects, edit and delete projects, manage people added to a project and create a copy of the project.
View and manage: With this option, a person can add new projects, edit and delete existing projects, manage people added to a project, and can create a copy of the projects.
View projects option:
With this option, you can either restrict one to viewing only assigned projects or give him access to view all projects. Following are the options present in it:
All projects: A person who has been assigned this access level will be able to see all projects.
Assigned projects: In this access level a person will only be able to see the projects that are assigned to him.
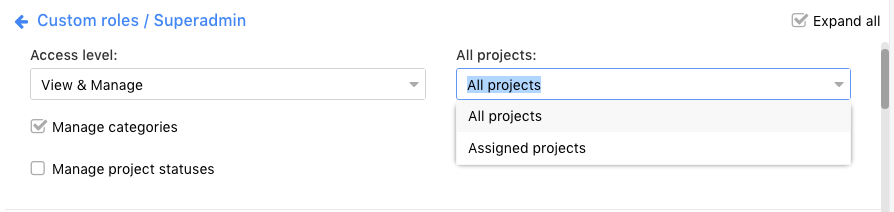
If you want to grant any person access to managing categories, you can select the checkbox Manage categories given in this section.
Also, if you want someone to manage project statuses then you can select the checkbox Manage project statuses given in this section.
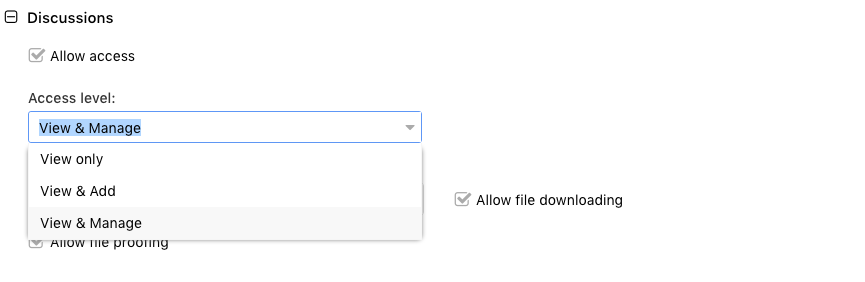
Discussions:
Following are the access levels for discussion:
View only: With this access level, a person can only view the discussion topics. He or she won’t be able to add or edit anything in it.
View and Add: With this access level, a person can view discussion topics and can also add new topics.
Note:
View and Manage: With this access level, a person can start a discussion, add comments, edit/delete or manage the discussion topic.
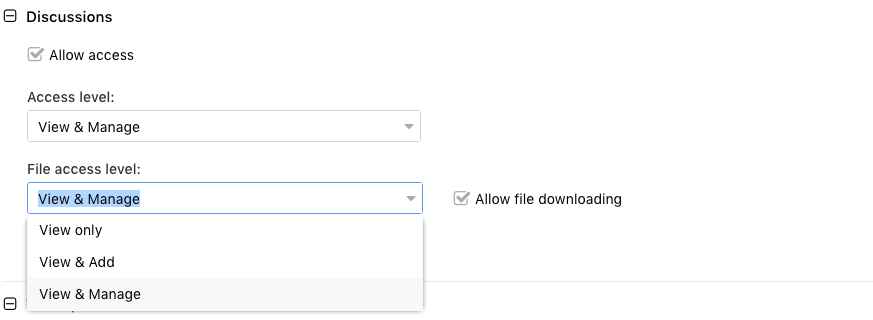
Following are the access levels for files uploaded in a topic and its comments:
View only: With this access level, a person can only view the files uploaded in the topic and its comments. He or she can neither upload files in the topic nor any comment. Also, the person won’t be able to delete files, upload a new version, view version history, move and rename the file.
View and add: With this access level, a person can view all files uploaded in the topic and its comments, and also he can add new files on the topic and its comments.
Note:
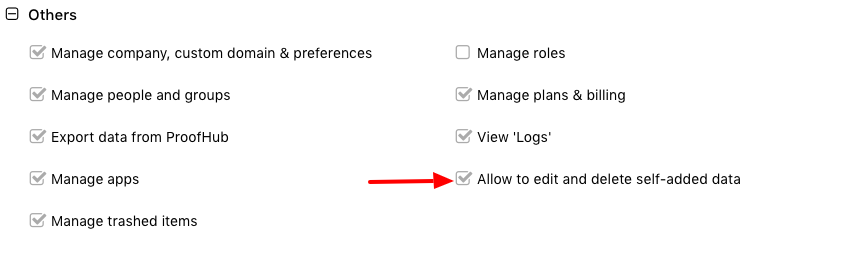
If you want to grant any person the access to edit and manage files uploaded by themselves, then you need to check the option Allow to edit and delete self-added data present under other sections.
View and manage: With this access level, a person can also upload files, delete files, rename files, move and manage files.
Remove section access option
By deselecting the checkbox Allow access option, one can remove access to the discussion section for a particular role.
Note:
In case access to the Discussion section is removed for a role then no notification for activity done in it will be received by the person having that role.
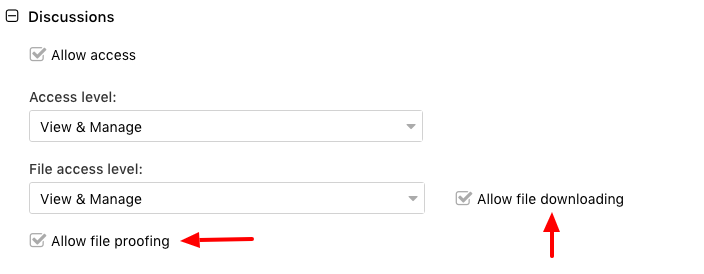
If you want to grant any person access to downloading the file, then select the checkbox of Allow file downloading given in this section.
If you want to allow a person to proof files, then you can select the checkbox Allow file proofing given in this section.
Tasks:
Following are the access levels for tasks:
View only: With this access level, a person can only view the tasks added under task lists. He or she will NOT be able to add tasks, edit or delete, comment on a task, and archive tasks.
View and add: With this access level, a person can view the task lists, add new task lists and tasks.
Note:
If you want to grant any person the access to edit and manage their own created task lists and tasks, then you need to check the option Allow to edit and delete self-added data present under other sections.
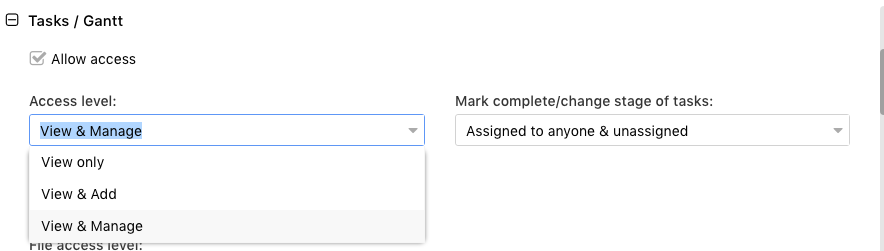
View and manage: With this access level, one can view a task list and its tasks, add task list and task, assign tasks to people, edit and delete them, copy and move both task list and tasks.
Access levels for posting comments on the task:
View only: With this access level, a person can only view the comments on the task. He cannot post, edit or delete a comment.
View and add: With this access level, a person can only view the comments of others and add his or her comments.
Note:
He or she can only edit his comment if Allow to edit and delete self-added data box is checked under the Others section.
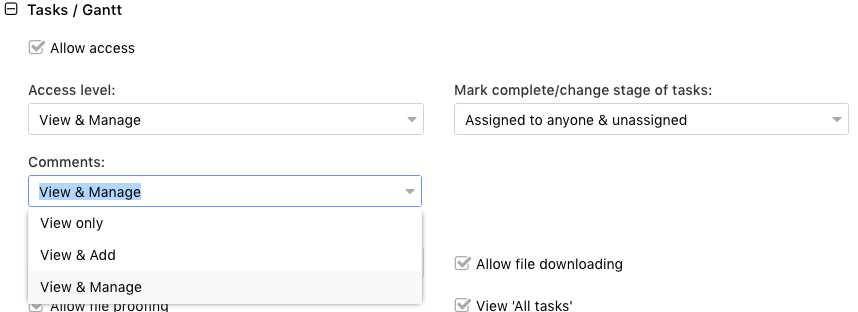
View and manage: In this access level a person can post new comments, edit and delete his comments, and other person’s comments too.
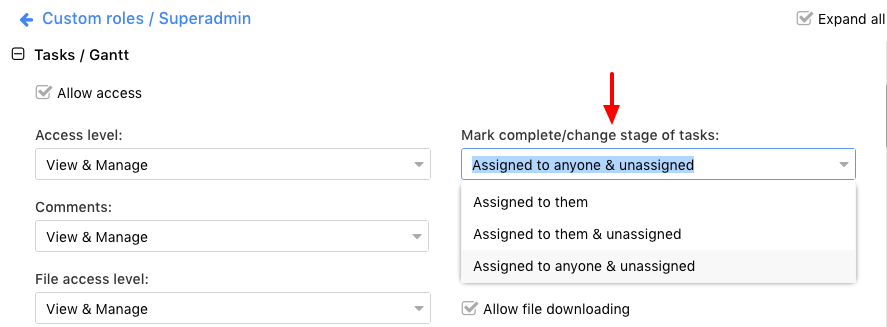
Access levels for completion or changing stage of tasks:
Assigned to anyone and unassigned: This access level allows a person to complete or change the stage of all the tasks irrespective of the fact that to whom it has been assigned.
Assigned to them and unassigned: With this access level, a person can complete the task assigned to him and also those tasks which have not been assigned to anyone.
Assigned to them: With this access level, a person can only complete the assigned tasks.
Access levels for files attached in tasks:
View only: With this access level one can only view files attached to tasks. The person cannot upload a new file, a new version of an existing file, rename, delete, move, etc.
View and add: With this access level one can view files attached to tasks and also attach new files in them.
Note:
If you want to grant any person the access to edit and manage files uploaded by themselves, then you need to check the option Allow to edit and delete self-added data present under other sections.
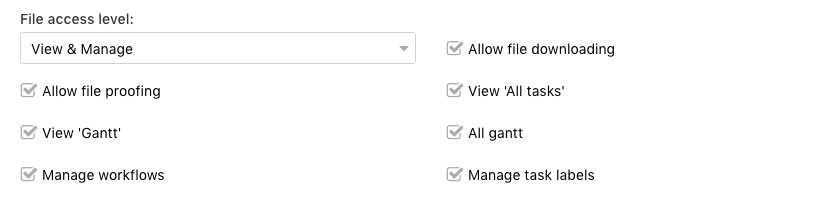
View and manage: With this access level one can view files attached to tasks, add new files to tasks and also manage them. One can rename, add a new version, move, delete a file, etc.
If you want to grant any person to view the All tasks tab under the Everything section then select the checkbox View all tasks given in this section.
If you want to grant access to view and manage the task list visible in the Gantt chart then select the checkbox View ‘Gantt’ given in this section.
If you want to allow one to be able to download all files attached in tasks then select the checkbox Allow file downloading given in this section.
If you want to allow one to be able to proof files attached in tasks then select the checkbox Allow file proofing given in this section.
If you want to allow one to be able to manage workflows then you can select the checkbox Manage workflows given in this section.
If you want to allow one to be able to manage labels assigned in tasks then you can select the checkbox Manage task labels given in this section
Remove section access option
By deselecting the checkbox Allow access option one can remove access to the task section for a particular role.

Note:
In case access of Task section is removed for a role then no notification for activity done in it will be received by the person having that role.
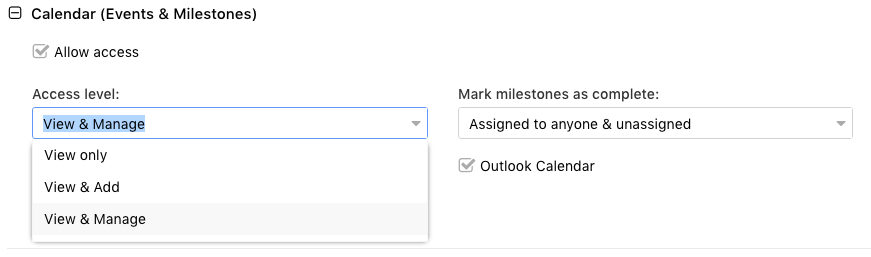
Calendar:
Following are the access levels for Calendar:
View only: With this access level, a person will only be able to view the items present in the calendar. He or she will neither be able to create milestones, events, and tasks nor will be able to edit and delete existing items from the calendar.
View and add: With this access level, a person can view existing items as well as add tasks, milestones, events, and quickies in a calendar.
Note:
View and manage: With this access level, a person can create, edit and delete milestones, events, and tasks.
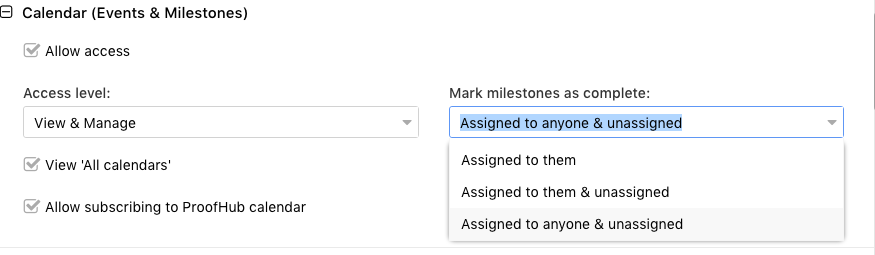
Access levels for completion of milestones:
Assigned to anyone and unassigned: This access level allows a person to be able to complete the milestones irrespective of the fact that to whom it has been assigned.
Assigned to them and unassigned: With this access level, a person can complete the milestones assigned to him or her and also those milestones which are not assigned to anyone.
Assigned to them: With this access level, a person can only complete the assigned milestones.
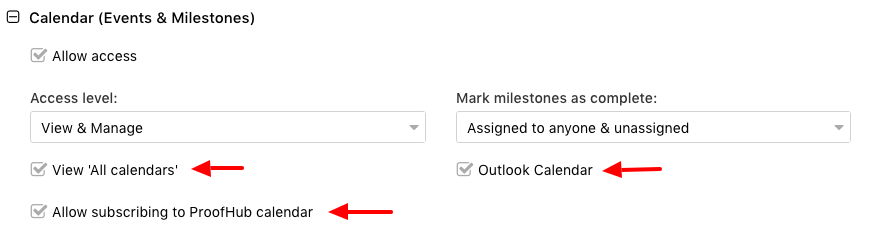
If you want to grant any person to view the All calendars tab then select the checkbox View ‘All calendars’ given in this section.
If you want to permit any person to subscribe ProofHub’s calendar to any third-party tool like Outlook then you can select checkboxes with Outlook and Allow subscribing to ProofHub calendar.
Remove section access option
By deselecting the checkbox Allow access option one can remove access to the Calendar section for a particular role.

Note:
In case access to the Calendar, the section is removed for a role then no notification for activity done in it will be received by the person having that role.
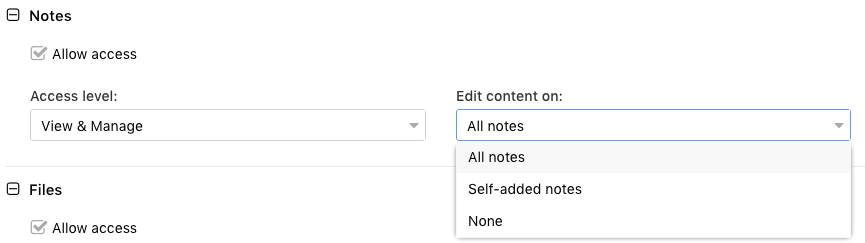
Notes:
Following are the access levels for notes:
View only: With this access level, a person can only view the notes. He or she will NOT be able to create notebooks, notes, edit and delete notes, and will NOT be able to post comments on the notes and manage the collaborators.
View and add: With this access level, a person can create notebooks and can add notes to them.
Note:
He or she can manage collaborators, can edit notes and notebooks which he or she created only if Allow to edit and delete self-added data option is selected.
View and manage: With this access level, a person can create notebooks, add notes, manage collaborators, edit and delete notes and can post comments on them.
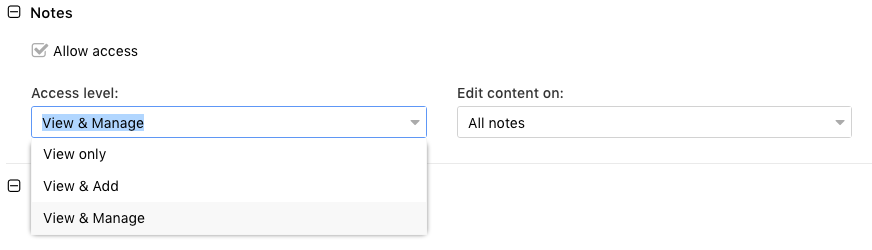
Access levels for managing content:
Following are the access levels regarding the content of a note:
All notes: With this access level a person will be able to manage the content of all notes irrespective of the fact that who has added it.
Self-added notes: With this access level, a person will be able to edit and manage the content that has been added by himself.
Note: With this access level, a person will NOT be able to manage anybody’s content. He will only have read-only access to the content.
Remove section access option
By deselecting the checkbox Allow access option one can remove access to the Notes section for a particular role.

Note:
In case access of Notes section is removed for a role then no notification for activity done in it will be received by the person having that role.
Files:
Following are the access levels for files:
View only: With this access level, a person can only view the files and won’t be able to add, rename, move and delete files, create new folders and subfolders, add new versions, etc.
View and add: With this access level, a person can view the files and folders, add in the Files section of a project, and also add new folders and files.
Note:
He or she can manage people selected for notification, can rename, upload a new version, move, delete files which he or she created only if Allow to edit and delete self-added data option is selected.
View and manage: With this access level, a person can also upload files and create folders and subfolders.
If you want to grant any person access to downloading the file, then select the checkbox of Allow file downloading given in this section.
If you want to allow a person to proof files, then you can select the checkbox Allow file proofing given in this section.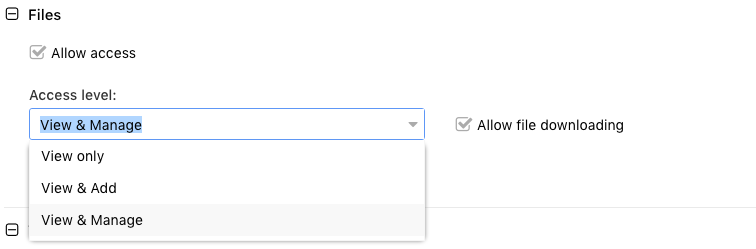
Remove section access option
By deselecting the checkbox Allow access option one can remove access to the Files section for a particular role.

Note:
In case access of Files section is removed for a role then no notification for activity done in it will be received by the person having that role.
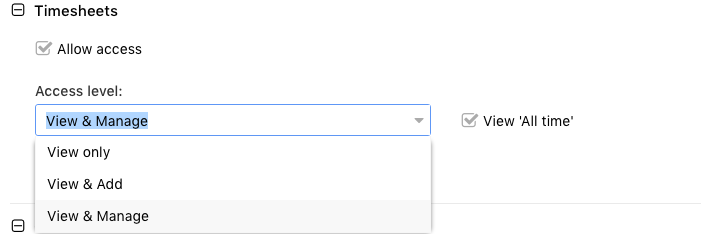
Timesheet:
Following are the access levels for the timesheet:
View only: With this access level, a person will only be able to view the timesheets and can download them in CSV format. He or she will NOT be able to add a new timesheet, record time in a timesheet, archive a timesheet.
View and add: With this access level, a person can view a timesheet, add a timesheet, and record time in a timesheet. If Allow to edit and delete self-added data option has been checked then he can edit and delete timesheets and time entries created by him or her only.
View and manage: With this access level a person can create, edit, delete and archive timesheets. Also, you can add, edit and delete time entries.
If you want to allow a person to view the All-time tab in the Everything section then select the checkbox View All Time present in this section.
If you want to allow a person to be able to export time entries to Freshbook then you can select the checkbox Export time entries to FreshBooks present in this section.
Remove section access option
By deselecting the checkbox Allow access option one can remove access to the Time section for a particular role.

Note:
In case the access of Time section is removed for a role then no notification for activity done in it will be received by the person having that role.
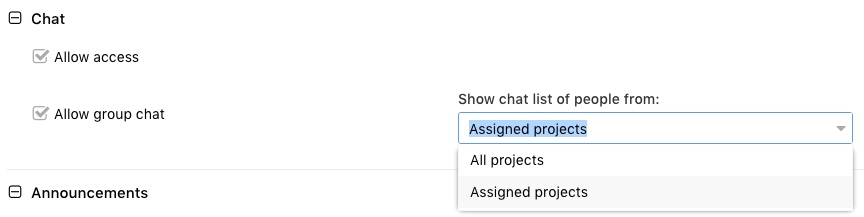
Chat:
Allow access: By selecting this option you can enable and disable chat for people
Allow group chat: By selecting this option you can allow one to do group chat with people visible to you by creating a group.
Note:
If you’ve restricted the users to only assigned projects, then they will be able to chat only with the people who are added to them in their assigned projects.
If we give them access to “All projects”, then you get an option to Show people from where you can either select “All projects” or “Assigned project”. In case you select “All projects” then people present in all projects will be visible in chat.
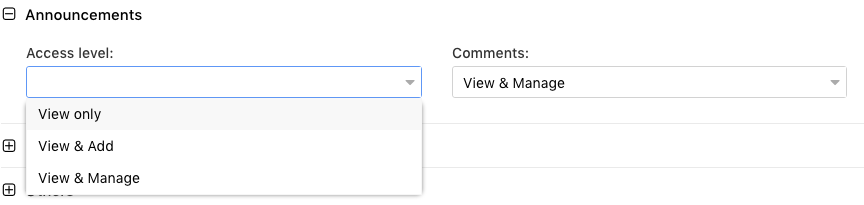
Announcements:
For announcements you can set the following access levels:
View only: With this access level one will only be able to see announcements and will not be able to add, edit or delete an announcement.
View and add: With this access level one will only be able to add announcements. In case Allow to edit and delete self-added data is selected then one will be able to edit and delete announcements added by them.
View and manage: With this access level one will be able to add, edit and delete all announcements irrespective of the fact that who has added them.
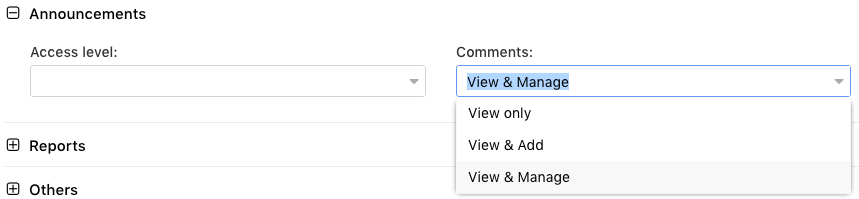
Access levels for comments in announcements:
View only: With this access level one will only be able to see comments made in an announcement. One will neither be able to add comment nor edit comment nor delete the comment.
View and add: With this access level one will be able to add comments on announcements. In case Allow to edit and delete self-added data is selected then one will be able to edit and delete comments made by them on announcements.
View and manage: With this access level one will be able to add, edit and delete any comment added in an announcement.
Reports:
For reports you can set the following access levels:
View only: With this access level, one will be able to view all existing custom reports. One won’t be able to add a new report, edit existing reports and delete a report.
View and add: With this access level one will be able to view all existing reports and one will be able to create a new custom report. In case Allow to edit and delete self-added data is selected then one will be able to edit and delete custom reports made by them.
View and manage: With this access level one will be able to view, edit and delete all existing reports. Also, one will be able to create new custom reports.
Remove section access option
By deselecting the checkbox Allow access option one can remove access to the Reports section for a particular role.

Note:
In case access of Reports, the section is removed for a role then no notification for activity done in it will be received by the person having that role.
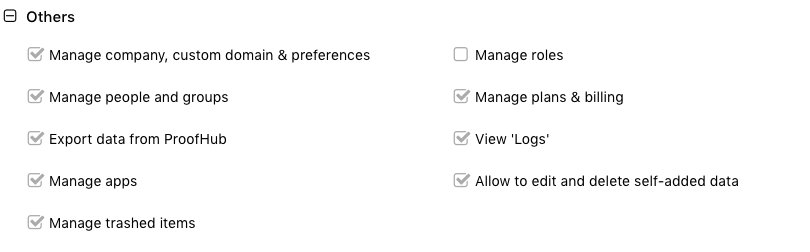
Others:
This section allows one to grant access to the other settings of the application.
Manage company, custom domain & preferences: You can select the checkbox of “Manage company, custom domain & preferences” if you want to provide access to ProofHub settings to any person from their account.
Manage people and groups: Similarly, you can use this option if you wish to give them access to managing people and groups created in the People section and also of adding new people to your account.
Manage plans & billing: With this option, you can provide users access to making payments or see invoices of the payment made previously.
Export data from ProofHub: With this option, you can allow a person to export data from your ProofHub account.
View logs: With this option, you can give users access to view activity logs from their accounts.
Manage apps: With this option, you can give users access to manage third parties apps (install and uninstall).
Allow to edit and delete self-added data: This option is related to the View and adds access level. If you want to give a person access to edit the data added by himself or herself, then you can select this option.
Manage trashed items: With this option, you can give access to the trash where one can manage items deleted.
Integrations:
One gets the option to provide or remove access to various third-party integrations.
Allow access to Dropbox files: With this option, one can provide access to attaching files from Dropbox.
Allow access to Google Drive files: With this option, one can provide access to attaching files from Google Drive.
Allow access to Box files: With this option, one can provide access to attaching files from Box.
Allow access to OneDrive files: With this option, one can provide access to attaching files from OneDrive.

How to edit a custom role:


How to delete a role:


Copy of role:


- Can't find the answer to your questions? Contact ProofHub Support
- Check our blog for the latest additions, updates and tips.